
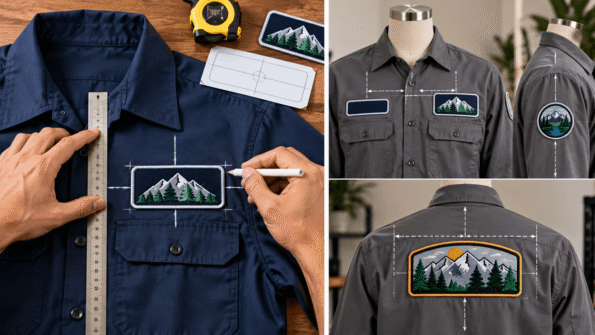
Good patch placement should look intentional, balanced, and consistent across every garment.
The easiest way to achieve that is to measure from repeatable garment reference points such as the centerline, shoulder seam, pocket edge, zipper, or yoke rather than positioning each patch by eye.
A reliable patch placement method is:
- Lay the garment flat.
- Find the garment centerline.
- Identify nearby seams, pockets, and hardware.
- Mark the intended patch center.
- Test the position with a full-size template.
- Check symmetry and garment movement.
- Record the final measurements for future garments.
This guide explains each step so you can measure chest, sleeve, shoulder, and back placement consistently.
For a broader overview of clothing patch materials and applications, start with our Clothing Patch Guide.
Why Measure Patch Placement Before Attachment?
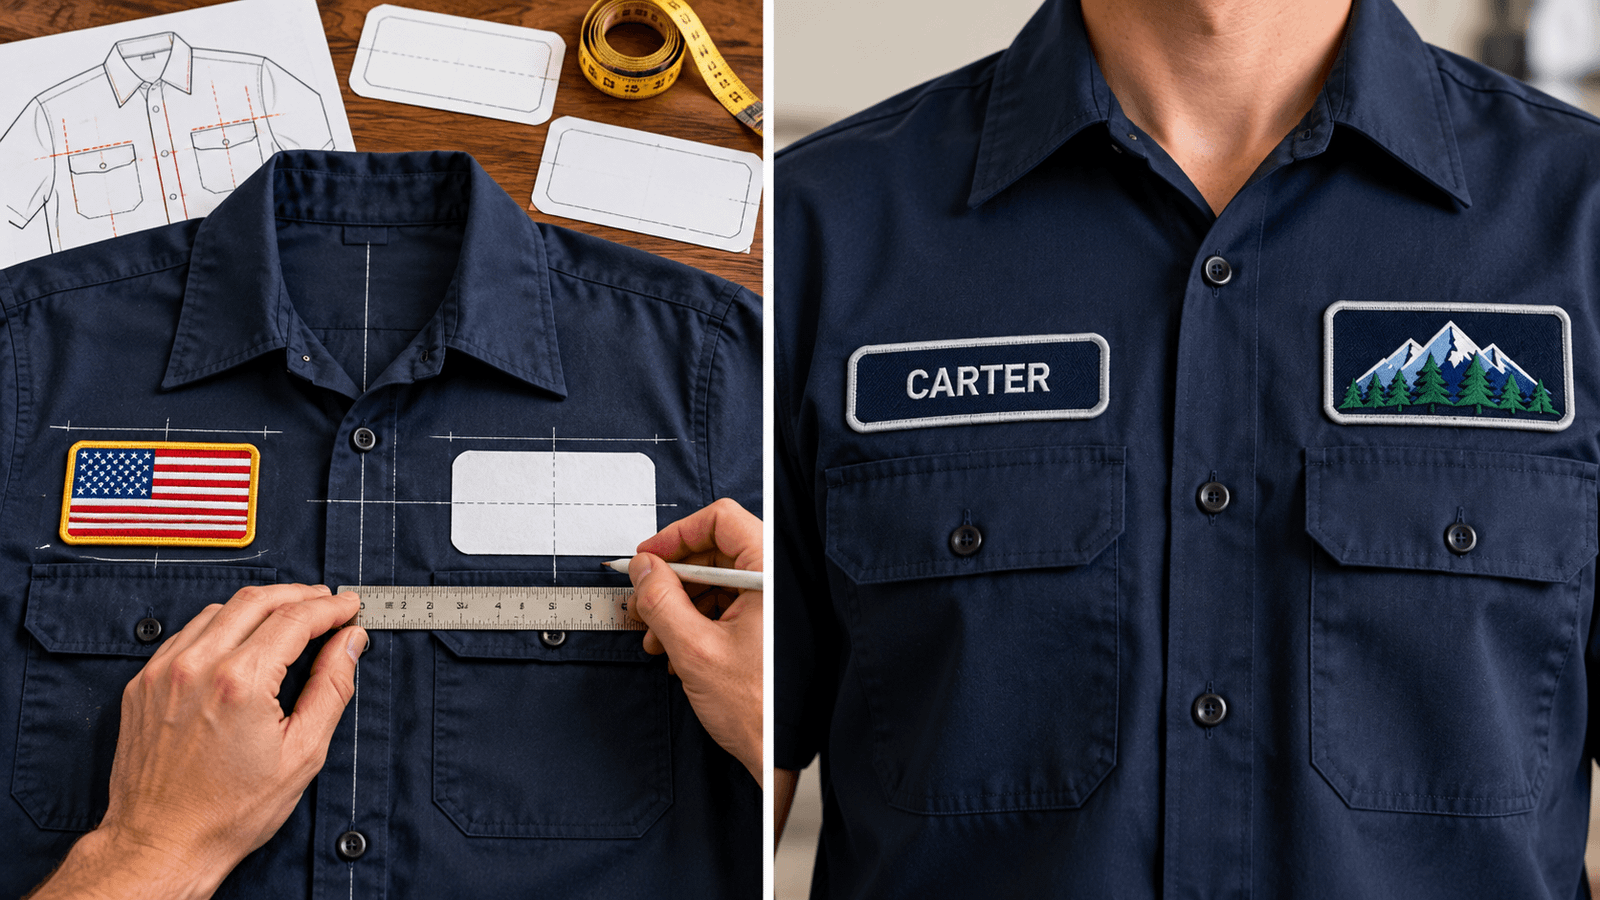
A patch can be the right size and still look wrong if it sits:
- Too high
- Too low
- Too close to a zipper
- Too far from a pocket
- Off-center
- Across a seam
- Uneven compared with a patch on the opposite side
These issues become more noticeable when several employees, team members, or garments use the same patch design.
Measurement creates a repeatable system.
Instead of saying:
Put the logo somewhere on the left chest.
you can record the location using consistent garment reference points.
That makes future attachment and reorders much easier.
Patch Size and Patch Placement Are Different Decisions
Patch size determines how large the finished patch is.
Patch placement determines where that patch sits on the garment.
They affect one another, but they are not the same decision.
For example, a chest area may comfortably hold a particular patch size, but you still need to decide exactly how far it should sit from:
- The garment center
- Shoulder
- Placket
- Zipper
If you are still choosing dimensions, use our Custom Patch Size Guide before finalizing placement.
How to Measure Patch Placement: 7-Step Method
Step 1: Lay the Garment Flat Naturally
Place the garment on a clean, flat surface.
Smooth obvious wrinkles without stretching the fabric.
Make sure:
- Shoulders are aligned.
- Sleeves sit naturally.
- Buttons or zippers are closed when appropriate.
- Side seams are not twisted.
- Collar is sitting normally.
Do not pull the garment unnaturally flat.
The goal is to reproduce how the clothing is actually constructed, not distort it to make measuring easier.
For jackets or heavier garments, make sure the lining is sitting naturally underneath the outer shell.
Step 2: Find the Garment Centerline
The centerline is one of the most useful reference points for patch placement.
On different garments, it may correspond with:
- Button placket
- Center zipper
- Center front fold
- Center back
- Collar midpoint
For a button-up work shirt, the placket gives you an obvious visual center.
For a pullover shirt or hoodie, find the midpoint between the side seams or shoulder structure.
For back placement, use the center of the collar and center of the lower garment as reference points.
You do not necessarily need to draw a visible line.
A flexible measuring tape, removable fabric marker, or temporary guide can help you identify it.
Step 3: Identify Structural Features Around the Patch Area
Do not measure placement without looking at the garment construction.
Mark or note nearby:
- Pockets
- Zippers
- Buttons
- Seams
- Yokes
- Reflective strips
- Shoulder panels
- Darts
- Reinforcement
- Existing embroidery
These features define the usable placement area.
A patch may technically fit within a chest panel but still look crowded if it sits too close to a zipper or pocket.
Likewise, placing part of a patch directly over a thick seam can make it sit unevenly.
Whenever possible, choose a relatively uninterrupted fabric area.
Step 4: Measure to the Center of the Patch
For repeatable placement, measuring to the patch center point is often easier than measuring to one outer edge.
Imagine a rectangular patch.
Find:
- Its horizontal center
- Its vertical center
Then position that center according to your chosen garment references.
For example, you may record:
- Patch center relative to garment centerline
- Patch center relative to shoulder seam
- Patch center relative to pocket top
Why use the center?
Because patch dimensions can make edge-based instructions confusing.
Center-based positioning gives you one consistent reference point.
Once the center is correct, the patch extends naturally around it.
Step 5: Test With a Full-Size Paper Template
Before attaching anything, create a template matching the exact patch dimensions.
You can use:
- Paper
- Cardstock
- Printed artwork
- Temporary mockup
Cut the template to the finished patch shape.
Place it on the garment.
Then inspect the clothing from a normal viewing distance.
Ask:
- Does it look centered?
- Does it seem too close to the pocket?
- Is it too close to the collar?
- Does it interfere with a zipper?
- Does the size feel balanced?
- Does the location still look right when worn?
A template can reveal placement problems that are difficult to notice from measurements alone.
Step 6: Check Symmetry
Symmetry matters when patches appear on both sides of a garment.
For example:
Left chest: Organization logo
Right chest: Name patch
Do not place both patches independently by eye.
Use the garment centerline and equivalent structural reference points.
Check that both patch centers have a visually balanced relationship to:
- Centerline
- Shoulder seam
- Collar
The patches do not always need identical dimensions.
A rectangular name patch and circular logo may require slightly different visual positioning.
The goal is visual balance, not simply matching every edge measurement.
Step 7: Record the Approved Placement
Once the placement looks correct, write it down.
Record:
- Garment type
- Garment size
- Patch name
- Patch width
- Patch height
- Placement area
- Horizontal reference
- Vertical reference
- Attachment method
- Any special notes
A simple record can prevent inconsistency when additional uniforms or replacement garments are prepared later.
How to Measure Chest Patch Placement
Chest placement is common for:
- Company logos
- Name patches
- Team patches
- Organization emblems
- Workwear branding
Begin by laying the garment flat and identifying the center front.
Then inspect the chest panel.
Useful reference points can include:
- Center placket or zipper
- Pocket edge
- Shoulder seam
- Collar
- Armhole seam
Chest Patch Without a Pocket
When there is no pocket, use the centerline and shoulder structure to create a repeatable reference.
Position the template first.
Then measure from a stable feature such as:
- Garment center
- Shoulder seam
- Collar seam
Record the patch center rather than simply writing “left chest.”
Chest Patch With a Pocket
A pocket creates a strong visual reference.
If the patch will sit above the pocket, center it relative to the pocket unless the overall garment design calls for another alignment.
Check that there is enough space between the patch and pocket edge.
The patch should not look like it is touching or falling into the pocket.
Also make sure the attachment method will not interfere with pocket access.
How to Measure Name Patch Placement
Name patches are often positioned on the opposite side of an organization logo.
When both are present:
- Place the primary logo first.
- Establish its vertical center.
- Position the name patch so the two feel visually aligned.
- Measure both positions from the garment centerline.
Do not automatically align their top edges if the patches have very different shapes.
A circular logo and narrow name strip can look more balanced when their visual centers align.
How to Measure Sleeve Patch Placement
Sleeves require more care because they curve around the arm.
Lay the sleeve naturally rather than flattening it excessively.
Use the:
- Shoulder seam
- Sleeve center
- Armhole
- Cuff
- Existing sleeve pocket
as reference points.
Measure down from the shoulder seam to the intended center of the patch.
Then check whether the patch remains visually centered on the outer arm.
Avoid placement that wraps too far toward the front or back of the sleeve.
A paper template is especially useful here because flat measurements do not fully show how the patch will behave on a curved arm.
How to Measure Shoulder Placement
Upper-arm and shoulder patches are common on uniforms and organization apparel.
The shoulder seam is usually the most useful reference point.
Measure consistently from the same seam location on each garment.
Then verify that the patch:
- Does not cross the shoulder seam
- Does not extend into the armhole
- Sits on the outer-facing portion of the sleeve
- Has enough clearance from sleeve pockets or zippers
Always confirm any organization-specific uniform placement requirements separately.
How to Measure Back Patch Placement
Large back patches should usually relate to the garment’s center back.
Start with:
- Center of the collar
- Center of the lower back panel
Use those points to establish the vertical centerline.
Then inspect:
- Shoulder yoke
- Hood
- Back seams
- Waistband
- Vent
- Decorative panels
Center your patch template within the usable area rather than automatically within the entire garment.
For a jacket, the clear panel between the yoke and waistband may be more important than the garment’s overall height.
Measuring Placement Around Seams
Seams should be treated as boundaries whenever practical.
Placing a patch over a heavy seam can:
- Raise one part of the patch
- Complicate sewing
- Reduce surface contact for heat application
- Make the design look uneven
Light construction seams may sometimes be manageable, but do not assume all seams behave the same way.
Test the patch template directly on the garment.
If moving the patch slightly produces a flatter, cleaner surface, that is usually preferable.
Measuring Around Pockets
Pockets create both visual and functional limitations.
Before attaching a patch near a pocket:
- Open the pocket.
- Check how the fabric moves.
- Confirm where the pocket bag sits internally.
- Make sure stitching will not close the pocket.
- Check whether heat could affect internal material.
Positioning should account for how the garment functions, not just how it looks while lying flat.
Measuring Around Zippers and Buttons
Leave enough clearance for hardware to operate normally.
For front jacket patches, do not position the patch so close to a zipper that:
- The patch edge rubs against it.
- Stitching interferes with the zipper tape.
- The design appears visually crowded.
The same principle applies to snaps and buttons.
Treat those elements as part of the garment design.
Account for Different Garment Sizes
This is one of the most important parts of bulk placement.
A placement that looks perfect on an adult XL shirt may not look identical on an XS.
Garments change in:
- Chest width
- Shoulder width
- Sleeve length
- Pocket position
- Overall proportions
Do not assume one fixed edge measurement will always produce the same visual result across every size.
Use Structural References
Reference measurements from features such as:
- Centerline
- Shoulder seam
- Placket
often scale more naturally than measuring only from the outside edge of the garment.
For example, measuring a chest logo from the garment centerline can produce more consistent visual positioning than measuring from the side seam.
Test the Smallest and Largest Sizes
For a bulk order, create placement samples on at least the smallest and largest garment sizes you expect to use when practical.
If the same placement system looks balanced on both extremes, it is more likely to work across the middle sizes.
If it does not, create separate placement specifications for different size groups.
Keep Placement Consistent Across Different Garment Styles
You may use the same patch across:
- Polo
- Work shirt
- Jacket
- Vest
but the garments may have different construction.
Do not copy measurements blindly between them.
Instead, keep the visual relationship consistent.
For example, the logo may remain:
Left chest, visually centered within the available panel
while the exact measured distance differs between the polo and jacket.
Create separate records such as:
Polo placement
Work shirt placement
Jacket placement
This is more reliable than forcing one measurement onto every garment.
Use a Placement Template for Repeated Orders
If many garments need the same patch, consider creating a simple reusable placement guide.
This could be:
- Cardboard template
- Clear plastic guide
- Printed measurement sheet
- Garment diagram
Mark:
- Centerline
- Patch center
- Pocket reference
- Shoulder reference
The template makes it easier to repeat the approved location.
For larger uniform programs, save the measurement record digitally as well.
Patch Placement Checklist
Before attaching the patch, confirm:
- Garment is lying naturally.
- Garment centerline is identified.
- Patch dimensions are final.
- Pocket position is checked.
- Zippers and buttons have clearance.
- Major seams are avoided where possible.
- Patch center is measured.
- Full-size template has been tested.
- Symmetry is checked.
- Garment movement is considered.
- Small and large garment sizes have been reviewed.
- Final placement measurements are recorded.
Once the placement is confirmed, you can explore Custom Clothing Patches for embroidered, woven, PVC, chenille, leather, and other clothing patch options.
Common Patch Placement Mistakes
Measuring From an Unstable Garment Edge
Side edges can change significantly between garment sizes.
Use stable structural references when possible.
Placing the Patch Before Checking the Pocket
A patch can accidentally restrict pocket access or become visually crowded.
Ignoring Garment Size Variation
The same absolute measurement may not look identical on XS and XXL garments.
Measuring Only One Side for Symmetrical Patches
Use the centerline to compare both positions.
Skipping the Template Test
A paper template is one of the easiest ways to identify poor placement before attachment.
Recording “Left Chest” Without Measurements
That description may be clear to you today but ambiguous when the next batch is prepared months later.
Create a Repeatable Patch Placement System
Good patch placement does not require complicated equipment.
It requires consistent reference points and a recorded process.
Start with the garment centerline. Identify seams, pockets, and hardware. Measure to the center of the patch. Test the position with a full-size template. Check symmetry and movement. Then record the approved location so it can be reproduced later.
For patch dimensions, use our Custom Patch Size Guide.
For broader material and clothing guidance, see the Clothing Patch Guide.
Once your placement and dimensions are ready, explore Custom Clothing Patches and request a free quote for your design.
Frequently Asked Questions About Patch Placement
How do you measure patch placement on clothing?
Lay the garment flat, identify its centerline and structural features, position a full-size patch template, measure to the patch center from stable reference points, check symmetry, and record the final measurements.
Should I measure a chest patch from the side seam?
Not necessarily. Side seams can move significantly between garment sizes. The garment centerline, pocket, shoulder seam, or placket may provide more consistent reference points.
How do I make two chest patches look even?
Use the garment centerline and compare the vertical centers of both patches. If the patches have different shapes, visual center alignment may look better than matching their top edges.
How do I place a patch above a pocket?
Use the pocket as a visual reference, test the patch with a full-size template, and leave enough clearance so the patch does not interfere with pocket access.
Should patch placement change for different clothing sizes?
It may. Garment proportions change across sizes, so test the placement on different sizes and use structural reference points rather than assuming one fixed edge measurement works everywhere.
How do I measure a sleeve patch?
Measure down from a consistent shoulder reference to the patch center, then make sure the patch sits on the outward-facing section of the sleeve without wrapping too far around the arm.
Should I use a paper template before attaching patches?
Yes. A full-size paper template helps you judge balance, symmetry, seam clearance, pocket clearance, and overall appearance before permanently attaching the patch.
